Showing posts with label tutorial. Show all posts

Friday, May 9, 2014

Pleated crib skirt tutorial

Pin It

*** I originally posted this tutorial in early 2011, I had my son in June 2011 and have really neglected this blog! But I somehow had this tutorial set to "draft" and have no idea how that happened. I hope you enjoy! ***


I finally finished the crib skirt for our little one's room! I looked up a bunch of different tutorials online, and then decided to take lots of pictures and make one myself. The two tutorials I found most helpful were from Hibler House and For such a time as this.

The first thing I did was cut out the muslin for the crib skirt deck. I purchased 1 1/2 yards of unbleached muslin that was 44 inches wide. I then cut it to 27 inches by 52 inches.


Then I serged around each of the edges of the muslin, since I figure I'll probably be washing the crib skirt plenty and didn't want it to fray. {If you don't have a serger, you can use a zig zag stitch or see if your sewing machine came with an overcast foot. Here's a tutorial I found on how you can use an overcast foot.}


Then you'll want to use a little dab of fray check on each of the corners before you trim the excess thread off. Let the fray check dry for at least 10 minutes before you make the cuts!


I decided to do a single box pleat crib skirt with a contrasting solid band of fabric on the bottom edge. Since our crib has 3 different height adjustments, I measured from the lowest one to the ground and it was just about 13 inches. So, I figured even though at the beginning when the mattress is higher off the ground, I'd rather the crib skirt look polished when it's at the lowest setting.

So I cut the following:
1- 56" by 5" green fabric for front of crib skirt (allowing for 4" pleat)
1- 56" by 10" striped fabric for front of crib skirt (allowing for 4" pleat)
2- 28" by 5" green fabric (one for each side of crib skirt)
2- 28" by 10" striped fabric (one for each side of crib skirt)
(I allowed for a 1/2 inch seam allowance for each hem and joining of seams... so the finished crib skirt would be 27" wide by 13" long for the sides, and 51" wide by 13" long for the front)


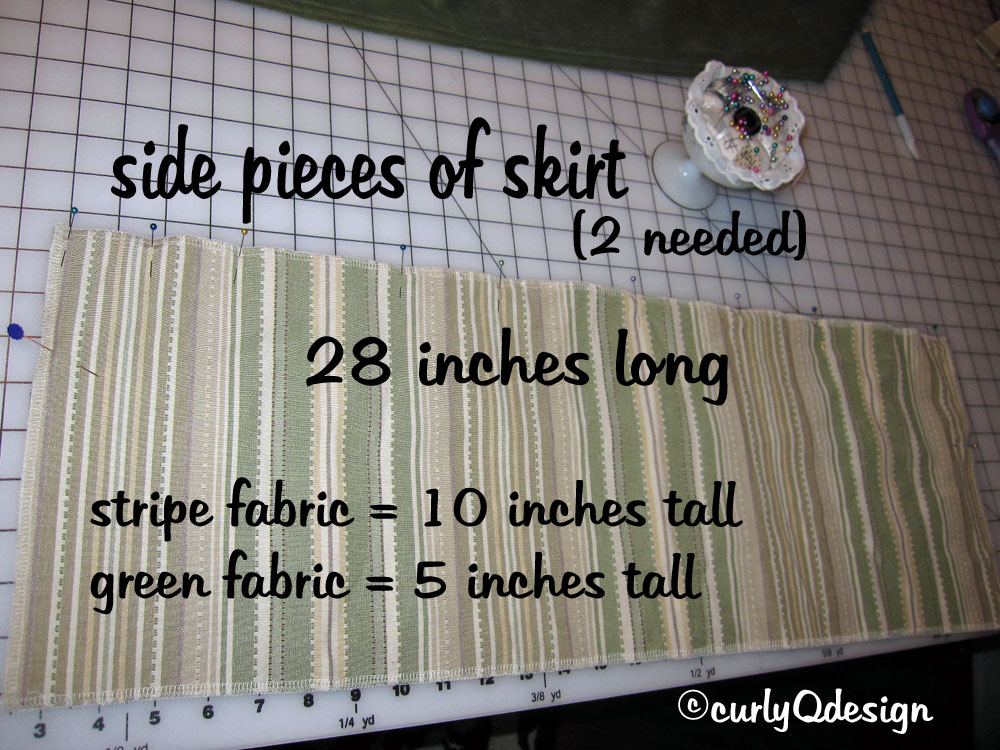


Then I serged around each of the edges of the striped fabric, because it really wanted to fray!


Again, use a dab of fray check at each corner and allow to dry before cutting thread ends off.


Next, I ironed a 1/2 inch hem for the bottom edge of the crib skirt.


Use a coordinating thread to sew your bottom hem. I sewed the hem at 5/8 of an inch from the edge.

Next, you'll want to pin together your two fabrics, right sides together. If you've serged only one fabric, pin with that fabric on top, so you can be sure to follow just outside of the thread line.


Then, iron open your seam.


If you don't have a walking foot... seriously consider buying one! It's a huge life saver when dealing with slippery (silk, minky) fabrics or with thick cuts of fabric it makes your life MUCH easier.


Again, when sewing two pieces together and only one piece of fabric has been serged, it's a good idea to have that piece on top, to follow along the thread lines of the serger!


I marked the center point of the middle piece of fabric for the skirt, after the 1/2 inch hem at each side the total measurement of the skirt front was 55 inches. So I put a pin at 27 1/2 inches.


And two inches away to the right and left of that center pin, put another pin to mark where you will fold in to make your box pleat.


Then you'll fold over at those points and pin the pleat into place.


Carefully sew over the pleat to secure it in place.


Almost done! Next, connect the front of the crib skirt to the front edge of the crib skirt deck. I put a pin in the center point of the crib skirt deck and matched it up to the center of the box pleat, and started to pin from the middle towards the outside edges. Our crib has pretty big hinges at the corners to lower the mattress as the baby gets bigger, so I left a small gap at each of the corner so the crib skirt would fall correctly.


Then connect each side piece to the crib skirt deck.


Voila! Stand back and enjoy your hard work!!


400 pixels pink sig

Friday, August 12, 2011

Cute closet dividers


When I was pregnant with my son, I searched for tutorials on making cute little closet dividers. We were "team green" however, so I waited until after he was born to complete this project. I LOVE his nursery, but figured there was enough green. :)

They are used to seperate the different sizes of clothes in his closet. Since my "little guy" was nearly 10 pounds at birth and I returned ALL of the newborn sized clothes I had purchased for him (thank goodness I only washed two pairs of jammies, everything else still had the tags!) I didn't make a NB divider!
I basically followed this tutorial.

I couldn't for the life of me find the right sized wooden O's at any of my local craft stores. I did however realize that Hobby Lobby sells them online! Major score!


I decided to go all "boy" and painted them blue.


I then traced the Os onto scrapbook paper and cut out. (I didn't do the best job of this.)

Using my cricut (which seems so "last year"... I'd love a silhouette, but can't justify it) I cut out the sizes for each O on blue vinyl.


To hang on your closet rod simply lift out the rod and slide the dividers on, then start organizing clothes!

Linking up to:

I Heart Naptime

400 pixels pink sig

Friday, January 21, 2011

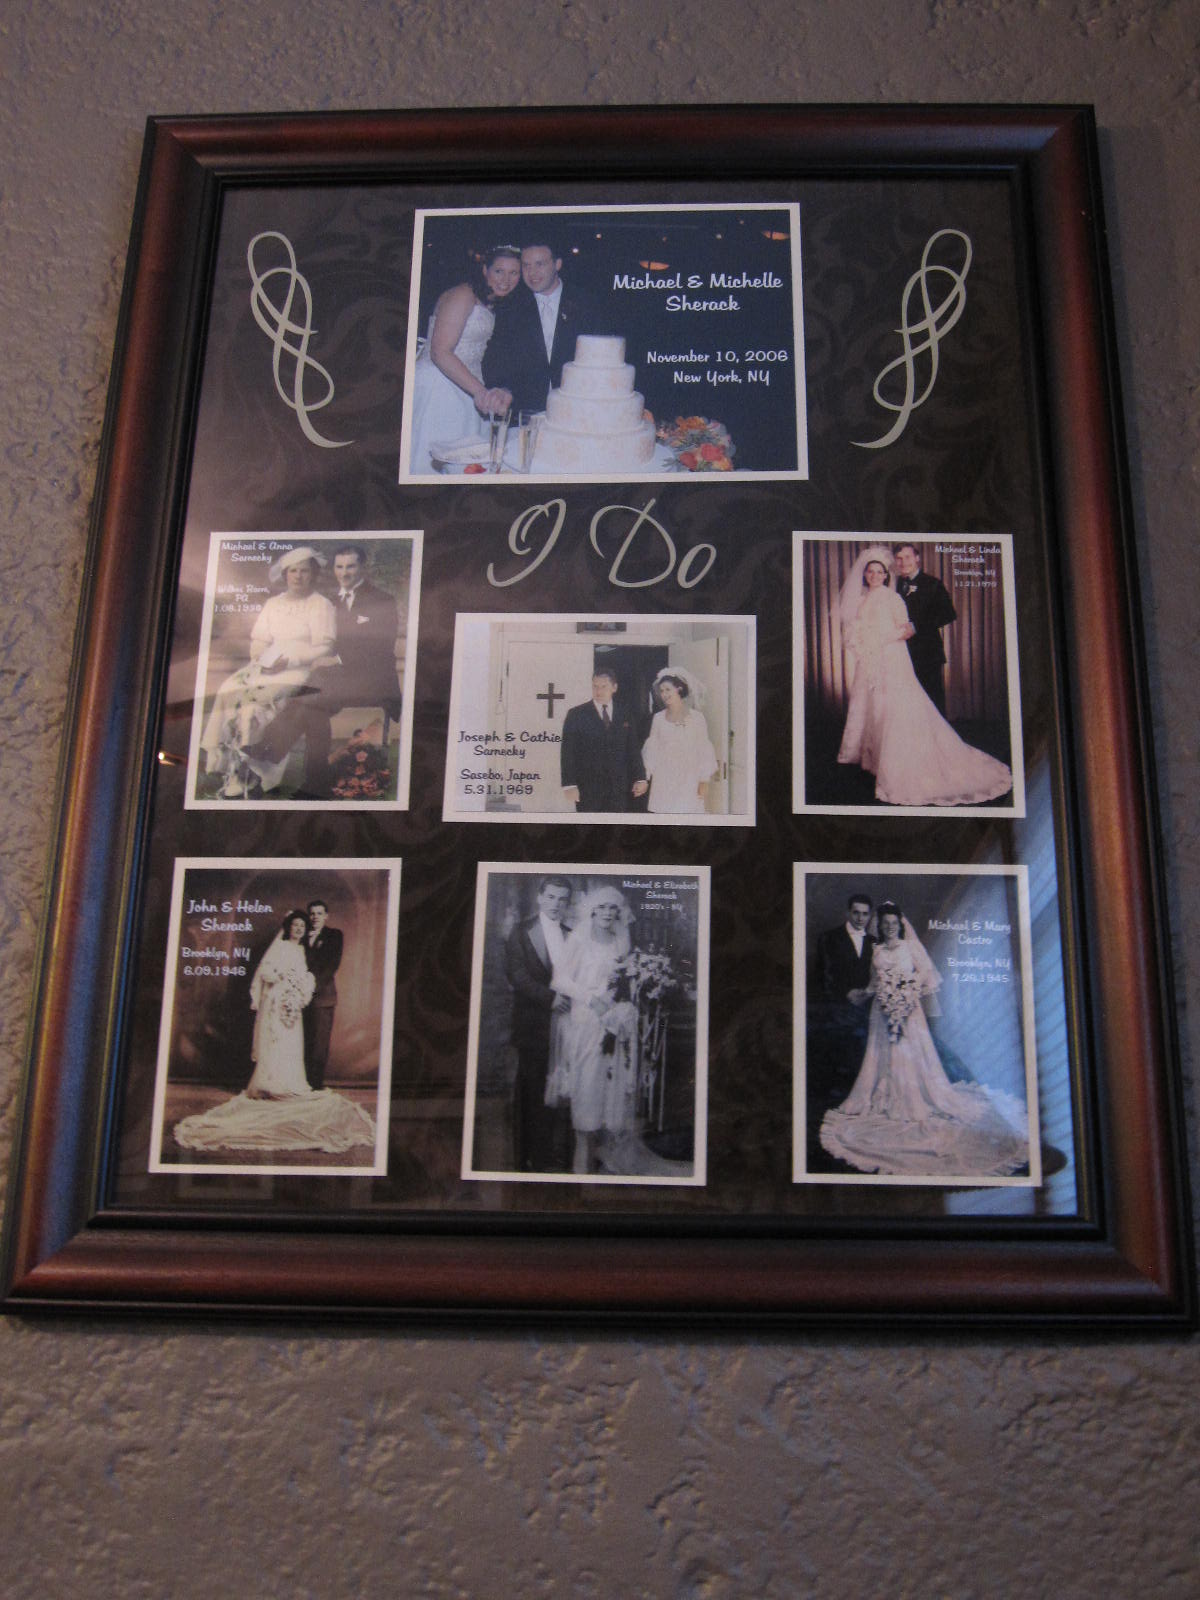
Love... and marriage through the years {framed}


This picture was taken at my wedding in November of 2006. I had framed wedding photos on display of our parents and grandparents. My two Aunts that traveled from London for my wedding are also captured in this picture, making the memory extra special.

For years, these photos have been collecting dust in my basement. I knew I wanted to display them, but wasn't quite sure how.

I used photoshop to retouch the older prints, and added the names and wedding dates. {Wish I'd had photoshop when I got married, would have been great to have added the names and dates then!}

I bought a large frame at Michaels, and instead of using a paper background or mat, I found a great chocolate brown damask fabric. I covered the cardboard insert and basically wrapped the corners like a present. I used hotglue and my staple gun to keep everything taught.


I then used cream cardstock to mount each photo and then used glue dots to attach the mounted photos to the fabric.


I also got my cricut into the action. I cut out in cream vinyl the words "I Do" and flourishes in a mirror image, and adhered them to the inside of the glass.

And... the finished product hanging on the wall in our family room!


Linking up to the following:
My Romantic Home
The Girl Creative
400 pixels pink sig

Saturday, February 20, 2010

Printing my own labels


To comply with the CPSIA and FTC, there are several things that need to be included on any labeling tag for items marketed for children under the age of 12. This is what will now be on every item I produce... My company name, "curlyQdesign" ; my website, http://www.curlyqdesign.etsy.com/; my location, 11793 USA; and that my items are "Made in the USA of Imported Fabrics {because, seriously... just about every piece of fabric I have, with the exception of my "Central Park toile" is made outside the USA!} The bottom half of the label is flipped upside down, so that when the tag is folded in half, is will be right side up on the "back" - since just about everything I make is reversible, there really isn't a "true" front or back, so I should be in complete labeling compliance. The rest of my label has the "ingredients" or fabric which is usually 100% cotton on one side, and 100% polyester (minky) on the other, so this label reads 50% cotton, 50% polyester. The next 3 lines show care instructions for laundering. The last part of the back of the label is the system I'm using for Date of Manufacturing, 10JFMAMJJASOND11 - {idea from "FayeMaloneDesigns" on an ETSY Forum about labeling} I'm using a non toxic fabric marker to put a dot under the month and year for each item. That way each label design can be used for 2 years!


After developing the label on PhotoShop Elements 8, I then edited the image to be flipped horizontally, so that I could print it out onto iron-on transfer paper by June Taylor and then I ironed the label onto a 7/8" {Offray, CPSIA compliant} white satin ribbon that I will sew into my handiwork!


The finished image before printing onto the transfer sheet looks like this:


I have also read that you can use freezer paper and print directly onto twill tape, this may be another project to try out soon... I will let you know how that works out! But for now, I'm very happy with what I've come up with to satisify the FTC and CPSIA and a very low cost! The iron-on sheets were purchased at JoAnn Fabric {with a 50% off coupon} for less than $5.00 for a package of 3 sheets! I was able to print out 55 of my design labels on one sheet, and 45 of the labels with care instructions on another!

I also just came across this blog which has many suggestions and tips about labels, as well:
http://duhbe.com/blog/?p=627/;

*** Revised at 9:34 pm EST***

Thanks for the concern from the anonymous poster. To the best of my knowledge, I am okay with one label - as long as all of the bases are covered. I also do not "manufacture" my own clothing, I am simply applying an applique to purchased bodysuits, shirts, and other articles of clothing, which are all aready labeled for both the FTC and CPSIA. However for my blankets, bibs, and burp cloths... these labels should be fine.

It really is all so confusing, but here's the link directly from the FTC and their "frequently asked questions" section... hope I've deciphered this corrrectly!

www.ftc.gov/bcp/edu/pbs/business/textile/bus50.shtm#Frequently Asked Questions